
301 Redirects: Sending Old URLs to New Ones
Change or remove a URL on your site and anyone who follows the old link lands on a dead page. A redirect sends them to the right place instead.
That "anyone" covers more than you'd think — a visitor with a bookmark, a search engine that already indexed the page, another site linking to you. The Redirects tool in your site settings is where you manage all of it. It's the fastest way to clean up after a URL change, and it handles bulk lists, so consolidating or pruning a batch of pages doesn't mean editing them one by one.
📬 A redirect is like mail forwarding, but for your website's pages.
Find the Redirects tool
Managing redirects requires site administrator access. Without it, the Redirects tab won't appear — ask an account owner or admin on your team.
Go to Site Admin › Settings, then open the Redirects tab — or open your Redirects settings directly.
Add a single redirect
- In From, enter the old path. Your domain is already shown for you, so type just the part that comes after it — for example
old-page. - In To, enter where it should go:
- a page on this site, starting with a slash —
/new-page - or another site entirely, as a full URL —
https://othersite.com
- a page on this site, starting with a slash —
- Check the preview below the fields. It shows exactly where the redirect will land, so you can catch a typo before saving.
- Choose the redirect type:
- Permanent (301) — the default. Use this when the change is for good. It passes your SEO value on to the new URL.
- Temporary (302) — use this when the old URL will come back.
- Click Add redirect.
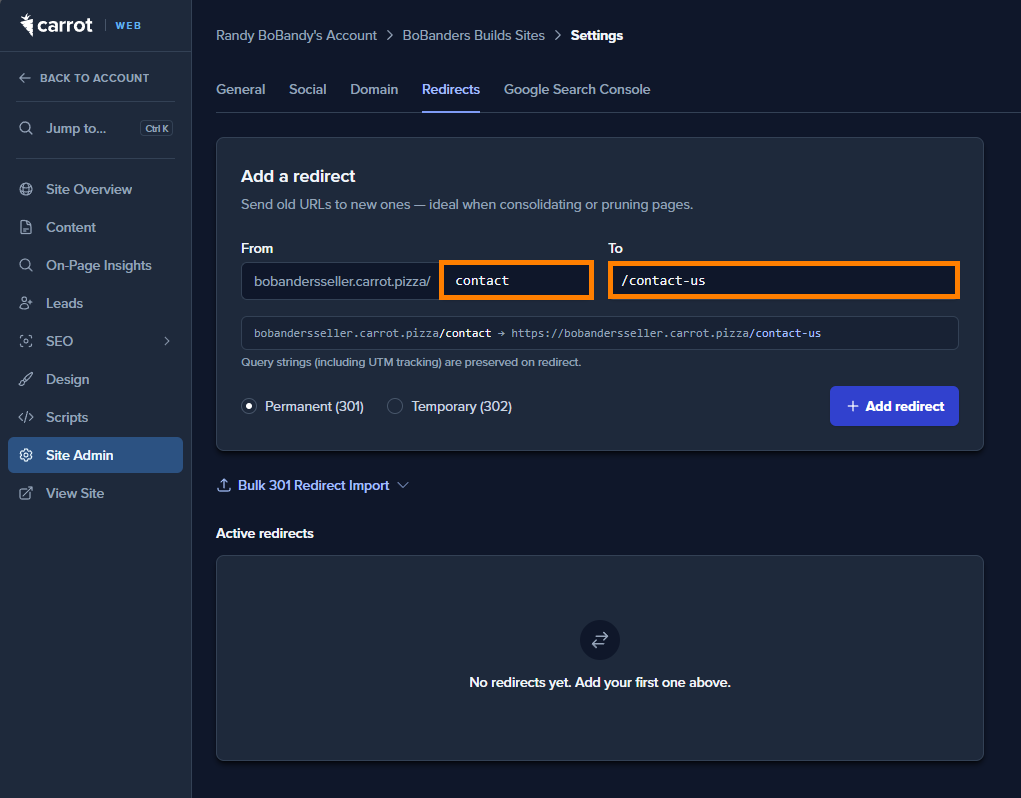
Your redirect appears in the Active redirects list below and takes effect on your site right away.
ℹ️ Query strings — including UTM tracking tags — are carried over automatically. A visitor who follows /old-page?utm_source=facebook keeps that tracking on the new URL, so your campaign reporting stays intact.
Redirect a whole section at once with a wildcard
To move everything under one path, add a trailing /* to both sides:
/blog/*→/resources/*— with/*on both sides the rest of the path carries across, so/blog/my-postlands on/resources/my-post, and one rule covers every page under/blog/./old-section/*→/new-home— with/*on the From side only, everything beneath/old-section/lands on that single page.
The * only works as a trailing /*. Patterns like /blog* or /a/*/b aren't accepted.
Add redirects in bulk
Moving a batch of URLs — after a site restructure, or when consolidating pages — is faster in bulk.
Click Bulk 301 Redirect Import to expand it.
Either paste your redirects, one per line as
from, to:/old-page, /new-page /about-us, /about /blog/*, /resources/*Or upload a CSV with one
from,topair per row. If your file has a header row (likesource,target), it's skipped automatically.Click Add / upload redirects.
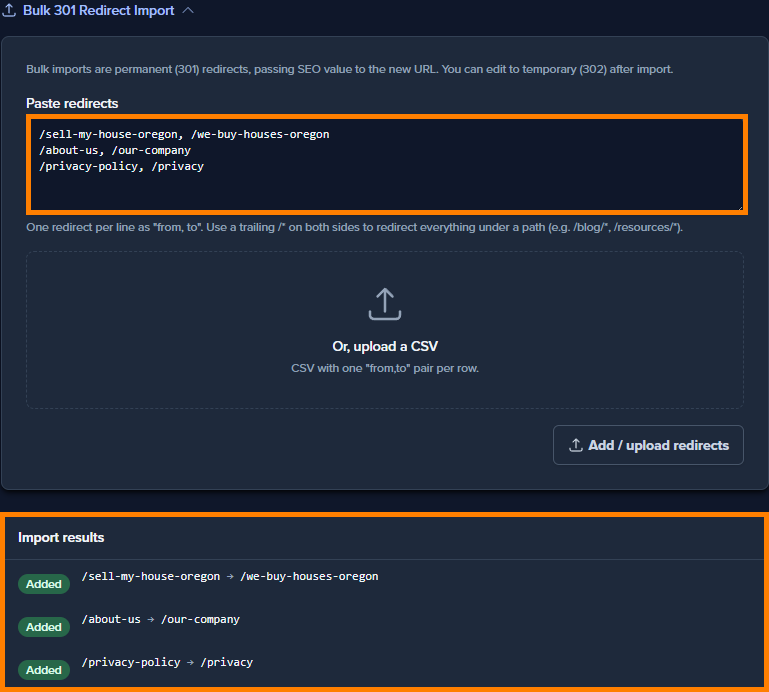
Each row is then reported back to you individually:
- Added — the redirect was created.
- Duplicate — the same From path appeared on an earlier row in this import.
- Already exists — a redirect for that From path is already on your site.
- Error — something in the row isn't valid, like a missing destination or a path we can't accept.
- Limit reached — your site is at its 1,000-redirect limit, so this row wasn't imported.
Rows that succeed are saved even if others fail, so you can fix just the problem rows and re-import them.
ℹ️ Bulk imports come in as permanent (301) redirects. If any of them should be temporary, edit them to 302 after the import.
Review, edit, and remove redirects
The Active redirects list shows every redirect on the site, with its From and To paths and a 301 or 302 badge for its type. The total count sits beside the heading.
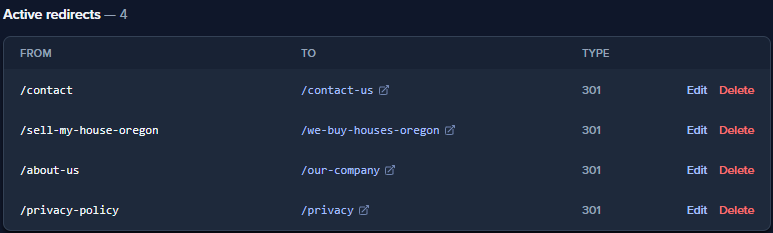
- Edit — change the paths or switch between 301 and 302. The row becomes editable in place; Save to apply or Cancel to leave it as it was.
- Delete — removes the redirect. You'll be asked to confirm first, since the old URL will start returning a dead page again.
- Filter — once a site has more than 15 redirects, a filter box appears. It matches on both the From and To paths, and narrows the list as you type.
Longer lists are paginated 25 at a time.
Good to know
- One thousand redirects per site. That's the cap; a bulk import that would cross it reports the extra rows as Limit reached.
- One redirect per old URL. Each From path can only point to one destination. To change where an existing redirect goes, edit it rather than adding a second one.
- Capitalization doesn't matter on the From path.
/Aboutand/aboutare treated as the same URL, so you only need one redirect to cover both. - Trailing slashes are trimmed for you.
/old-page/and/old-pageare the same path. - A redirect can't point at itself. The From and To paths have to be different.
- Only redirect to a relevant page. Send an old URL somewhere with the same intent. If you delete a page and have no close replacement, it's usually better to let the URL drop from search results than to redirect it somewhere unrelated — irrelevant redirects can work against your SEO.
If you ever see "Saved, but we couldn't update your site," your redirect was saved successfully but didn't reach your live site on that attempt. Reload the page to check, and contact us for assistance if it keeps happening.
Related
- How to Keep Your SEO Rankings When Moving to Carrot — where redirects fit into a site migration.
- Understanding Google Search Console's Page Indexing Report — find the dead URLs worth redirecting.
- Keyword Cannibalization — when consolidating competing pages (and redirecting the losers) helps your rankings.
Was this article helpful?